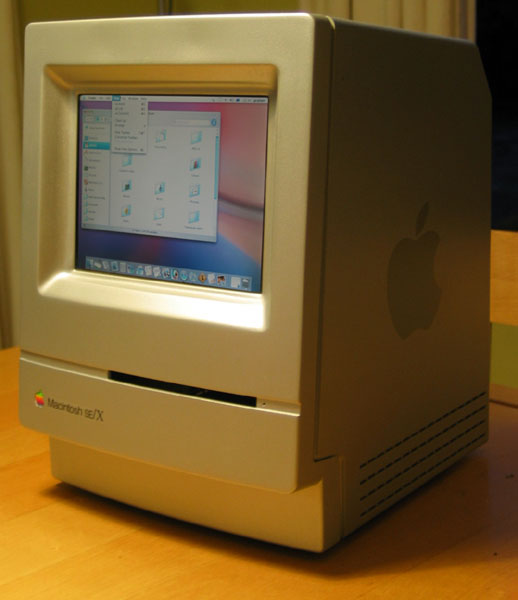
Macintosh SE/X
A Macintosh SE that runs Mac OS X*

Introduction
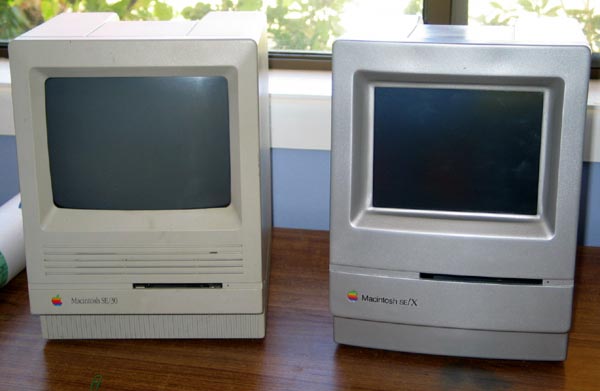
Many Mac old-timers will recall the story of the Macintosh SE/30. For its day, a neat all-in-one box that was as powerful as its more conventionally cased Mac II brethren. However, its name was an anomaly - at the time Apple used the lowercase 'x' suffix to indicate its 68030 powered models - in those days the top of the line. This included the Mac IIx and IIcx "compact x" for example. So when they decided to что посмотреть в Туле за 1 день and release a updated 68030-based SE, it gave them a problem. The obvious name was Mac SEx .No doubt if Apple had been a European company that's exactly what it would have been called, but the heritage of the Pilgrim Fathers must have got the better of them...
Fast forward 15 years or so. Compact Macs are long forgotten and Mac OS X is with us. All-in-one desktop Macs still exist - the iMac - but it's much larger (usefully so - the old screens were really quite pathetic by today's standards). However in 2005 Apple released the Mac Mini, and suddenly it looks as if those old SE cases might have a use after all - time to make a TRUE Mac SE/X - a Mac SE that runs OS X!
To give this project some point beyond simply "because it can be done", I decided that this project would be to make a music server, and also a transportable device that could be used to provide a sound system at parties, etc. To that end, think of it as a "super-iPod", with 60W per channel audio! It also shows how the compact line might have looked in this age of the G5 and Mac Pro tower case.
Anyway, pointless or not, I built it, and here's the result.
Construction
The construction is based on the case of a Classic II, which is actually a little more streamlined and modern than the older Mac SE or SE/30, with a curved front, no fake ventilation slots and a neater floppy drive slot. I managed to procure several Classic II cases - the first on eBay for $20, but after putting the word out at my local uni, I got several more given for free. Some of them still working! (Unlike the eBay one).
The first job was to procure a 9" LCD screen with decent resolution. There aren't that many on the market and in the end I plumped for one designed for in-car DVD systems which has a native resolution of only 640 x 480 but supports VGA (1024 x 768) by anti-aliased scaling. In practice this was perfectly usable, even with iTunes' small text. Having obtained the screen - another eBay purchase, costing about AU$200 - it was a case of stripping one of the Classics and seeing roughly how everything would fit. Once the original CRT and analogue board are removed from a Classic, it's amazing just how much space there is in those things! It was clear that the physical dimensions of the LCD were smaller than the original aperture by a small amount, so the task was to build a neat-looking screen surround that looked like it was made that way, not a bodge-up. It's been many, many years since I built model aircraft kits, but some of those old skills were dusted off and applied to the job in hand.
Gobs of epoxy, filler and plasticard later, the screen was adapted to fit. Lots of elbow grease to file and sand the filler to shape, smooth off, primer-filler, sand again, and again, and again...
Another much easier job was to widen the floppy slot to accept a CD.
Next, in went the Mini. I had two possible approaches. To get the CD drive slot close enough to the front of the SE case, I could either remove the drive and extend it, or else I could keep the Mini more or less intact and re-engineer the chassis as needed. After examining both approaches, flip-flopping several times between the two, I decided that the latter option was better. It was more work, but in the end it came down to wanting to keep the Mini as unmodified as possible, in the interests of actually keeping it working. Besides, hacking the cases represented a much smaller financial loss if it all went wrong! Major chassis work was needed because the depth of the Mini meant that the drive slot wouldn't be anywhere close if the Classic's original chassis "platform" was retained. This had to be extensively cut away, which made it very weak and not self-supporting, so pieces of sheet metal had to be fabricated, folded and rivetted into the chassis to restore its rigidity and provide somewhere for the Mini to sit. The top case of the Mini was removed so the slots could be placed closer together. While removing most of the Mini's RFI shielding it should be remembered that the Classic's case is itself sprayed internally with an RFI shielding paint.
The Mini's brick power supply was fitted underneath the Mini where the old Classic's logic board used to go. This left a large amount of room in the upper half of the case behind the screen. I had a semi-retired audio power amplifier kicking around that I'd built about 20 years ago, so I decided to cannibalise it and put it in there to provide some useful audio "grunt". At 60Wrms per channel that's quite an iPod! This amp also had a decent power supply which I could pick up power for the screen from without needing the original screen's power supply. More chassis cutting, bending and rivetting and the amplifier was installed.
The final piece of the puzzle was the back panel. This was simply dealt with by buying an off-the-shelf combination Firewire/USB hub, discarding its outer case and fixing the board in behind the rear panel. This could simply plug into the Mini's ports. The power and video were taken care of internally (mains power is fed in through the original Classic's supply connector and switch), which only left the audio jack and ethernet. Simply solved with a few parts from Radio Shack. The speaker outputs are a pair of Cannon 3-pin chassis sockets. A plasticard escutcheon was made up to tidy up the rear panel and to provide a professional appearance.
For more photos of construction, have a look at the gallery.
Finish
The case is finished using a standard acrylic metallic car paint (I believe the colour is Holden Astra Silver, which I matched by eye against the G5 I had at work). The case was smoothed a little using primer-filler and sanding so it loses some of the original Classic's "orange peel" finish. The G5-like decals on the sides were made by printing out the Apple symbol at a very large point size onto an Avery label, cutting out and using as a spray stencil.
The Macintosh SE/X decal was created in some program or other and printed onto special laser waterslide decal paper. Once applied, a heat gun is used to fuse the toner in place making it quite a hard-wearing decal. The rainbow badge was rescued fro the original Classic and reinserted after all the painting was done.
Finally the case is laquered using clear gloss laquer.
Switch-on
To provide seamless switch-on, a small relay is used to momentarily "make" the connections from the Mini's power switch when the system is powered up. Thus to switch on you just... switch it on. The screen auto-detects the VGA signal and switches itself on.
Once built, it was time to test. The Mini booted up first time, and the screen displayed the familiar Mac OS X startup. Some minor adjustment was needed to the alignment of the drive slot to accept a disc smoothly, then into iTunes to play some music. Volume control via software, all works fine. Though there was a little bit of mains hum on the amplifier output indicating an earth loop - not much, but enough to be annoying. In trying to fix this, I somehow managed to short something and blew one channel of the power amplifier - as of writing that still needs to be fixed. Otherwise, works great!
Speakers
A project like this really needs its own speakers, and with several spare Classic II cases still kicking around... well, why not?
Two more cases were stripped out and all of the fixing points on the back of the front panel carefully measured. This was transferred to a piece of thick MDF used to provide the speaker mounting board. The front of the cases were cut down to make a frame with a large aperture, but whose outside edges retained the original Classic's design. Speaker units were assembled onto the MDF board and this was bolted to the front frame using the same screws that originally held the CRT and chassis. A heavy putty was sandwiched between the edges of the MDF and the frame to prevent any nasty buzzing resonances. Sound deadening panels were glued to the inner panels of the rear "bucket" and all the ventilation slots were sealed with plasticard and silicon sealant. The idea was to try and make it as acoustically sensible as practical while realising it would never make the perfect enclosure. The front frame was covered using speaker cloth and then the whole thing assembled, including a roll of acoustic wadding in the interior.
Result? Well, they don't sound bad at all! Attention to the possibility of the cases resonating and buzzing means that they don't - and while the responses of the units hasn't been measured, they sound pretty acceptable, with reasonable bass and no obvious peaks or dips. And of course as a matching set with the SE/X, it's a pretty cool sound system to wheel out at parties. Plus you can do lots of other things on it, small screen dimensions allowing. Serving from iTunes wirelessly means that I don't have to clutter my laptop's hard disk with thousands of audio files.
Total cost for the CPU unit is about $900 (Australian) which the biggest part is of course the Mac Mini, but the way it's built-in means it can be recovered intact if I ever wish to. The remainder is mostly the screen. All the other parts were either donated or I had sitting around, like the power amplifier.
The speakers cost about a further AU$170, since I bought all the drive units and crossovers and acoustic materials new from Jaycar.
Photos of speaker construction can be found here.
Specifications (and loose comparison with original SE/30)
| Spec | SE/30 | SE/X | x Gain |
|---|---|---|---|
| Clock | 16MHz 68030 | 1.25 GHz PowerPC G4 | ~78† |
| Disk capacity | 40MB | 80GB | 2000 |
| RAM | 1MB | 512MB | 512 |
| Removeable media | 1.4MB Floppy | CD/DVD/CD-R/DVD-R 4GB | ~2800 |
| Screen | 512 x 342 B+W | 1024 x 768 32-bit colour | ~143 |
| Ports | ADB, SCSI, RS-432 x 2 | 6 x USB, 2 x Firewire, Ethernet | |
| Weight | ~9kg | ~13kg | ~1.5 (!) |
Page views:
*I toyed with the idea of calling this the Mac SE/XI - "this one goes to eleven!", which still sounds sexy :)
© 2006-2008 Graham Cox